- Details
- Category: photography photography
- Published: 02 May 2014 02 May 2014
 |
|
A technique for black and white conversion that can yield surprisingly good results.
|
Inverted Black and White
Here's a simple Photoshop tip for black and white conversion that can yield very good results with some photos. Most people do a "straight" conversion from a color photo using a "Black and White Adjustment Layer". I've found that, if you invert the colors *before* applying the black and white conversion, you often get interesting results. Now, this may not work for all photos. I would certainly not use it for portraits for example, as this can make people look like zombies (remember how people looked in film negatives?). However, for nature subjects it can work very well. It's also simple enough of a technique that you can try it in most photos to see if "it works".
The Technique
Consider the photo in Figure 1. It's a nice enough flower shot, and I'm happy with it even in color. However, I have a week spots for black and white photography and wanted to see how it worked in that medium.
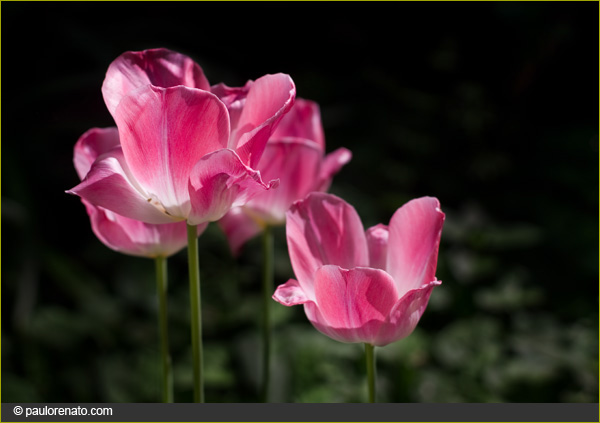
Figure 1 - Color Original
Figure 2 shows the typical black and white conversion setup in Photoshop. Notice the "Black & White" adjustment layer on top of the original photo in the "Background" layer. This adjustment layer has many conversion options, so I usually cycle through them (using keyboard up/down arrows) until I find one that I'm happy with. The conversion in Figure 2 is not too bad. However, as is typical of photos with a black background, It feels a bit too somber and classical. I wanted to impart a lighter, fresher mood to the whole picture, something more in tune with the spring spirit.
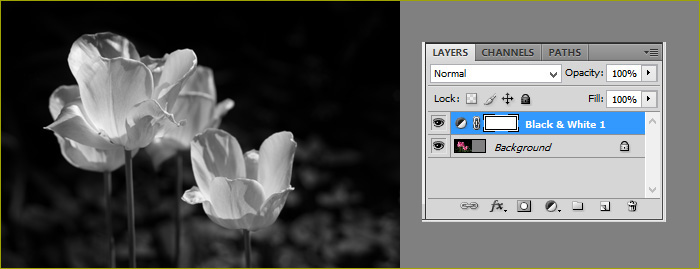
Figure 2 - Normal Black and White Conversion
Figure 3 shows the "Inverted Black and White Setup":
1) First duplicate the background layer with Ctrl (Cmd) + J (or Layer -> Duplicate Layer in the Menus)
2) Invert the colors with Ctrl (Cmd) + I (or Image -> Adjustments -> Invert). I also renamed the layer to "Inverted" but that's optional.
3) Apply the Black & White" adjustment layer on top of the Inverted
The result is shown in Figure 3. I like this version much more as it is lighter both in color and in feeling. The conversion also brought-up the texture in the flowers quite nicely. By keeping the original layer and the background layer, you can easily toggle between the two conversions to see which one you like the best.
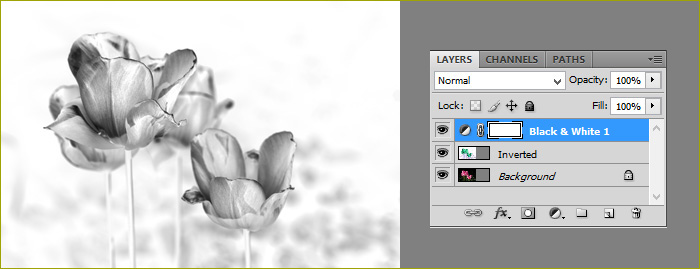
Figure 3 - Inverted Black and White
Using the keyboard commands, this conversion is really fast (Ctrl J + Ctrl I) and is worth considering with some photographs. Enjoy!
Comments, questions, suggestions? You can reach me at: contact (at sign) paulorenato (dot) com